


Introduction
![]()
Free Download
"Wear skin" transfers skins from a master shape to a targeted shape such as a "cover" to that master shape.
In a nutshell, after making the clothes for your human body model, you can apply automatically the skin to its clothes.
This plug-in supports both "Blend-skin" and "Classic-skin", but it is recommended to use "Blend-skin" in the future.
1. Designate the master shape
Select the master shape, and then memorize it (you can also designate it later).
2. Start "Wear skin"
After selecting the targeted shape,
Tools menu -> Plug-ins -> Wear skin, start the plug-in. The following dialog box will appear.
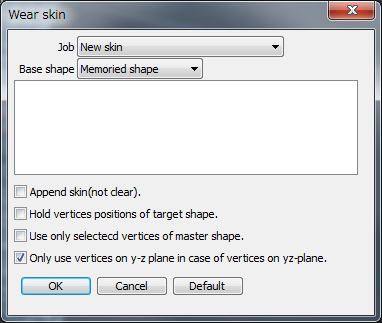
3. Set the runtime setting
You will specify the various settings. The contents are as follows.
"Job":
You can choose between the following options:
1. "New skin"
this is the main function of this plug-in. You set the new skin to the selected shape.
2. "Append skins only active vertices"
Apply the skin only to the Selected vertices in the modify mode. You will use the partial fine-tuning.
"Base shape"
You will specify the master shape. Even without allowed to pre-stored, you can specify it later. Instead of memorizing the master shape,
You can choose the mater shape in the list."
"Append skin(not clear)."
This setting is enabled only in the case of the "Classic-skin". Plugin apply skins Without clearing the skin's pre setting of the shape.
Do not check normal.
"Hold vertices positions of target shape."
This setting is a safety measure so the shape does not deform after setting the previous skin settings.
You can use the conversion matrix of joint and shape is different in classic skins and
use when applying the skin from moving joint to shape.
"Use only selectecd vertices of master shape."
For advanced users. I the case that you want to exclude some vertices from the calculation of the skin binds.
"Only use vertices on y-z plane in case of vertices on y-z plane."
This specification is meaningful only in the case of a symmetrical shape. If you check this, you will prevent to apply asymmetric skin to points on the plane of symmetry.
4. Run
Press the "OK" button, and then run immediately. If you have any problems, the message-box will appear. When it is done, the "End Job" message will appear.
Developer
Masa
Installation Notes
For the Windows users
Go to "plugins/win" directory and select "wear_skin.dll" if you want to use 32-bit version of plugin, or "wear_skin64.dll" if you want to use 64-bit version.
Then drag and drop the selected file to your local document directory where you will find "Shade 3D ver.15/plugins" directory. Simply drop the .dll file there.
For the Mac OS X users
Go to "plugins/mac" folder and select "wear_skin.shdplugin" file.
Then drag and drop the selected file to your local "Documents" folder where you will find "Shade 3D ver.15/plugins" folder. Simply drop the file there.
![]()
Free Download